Make Smart Usb Night Light Using Basic Components
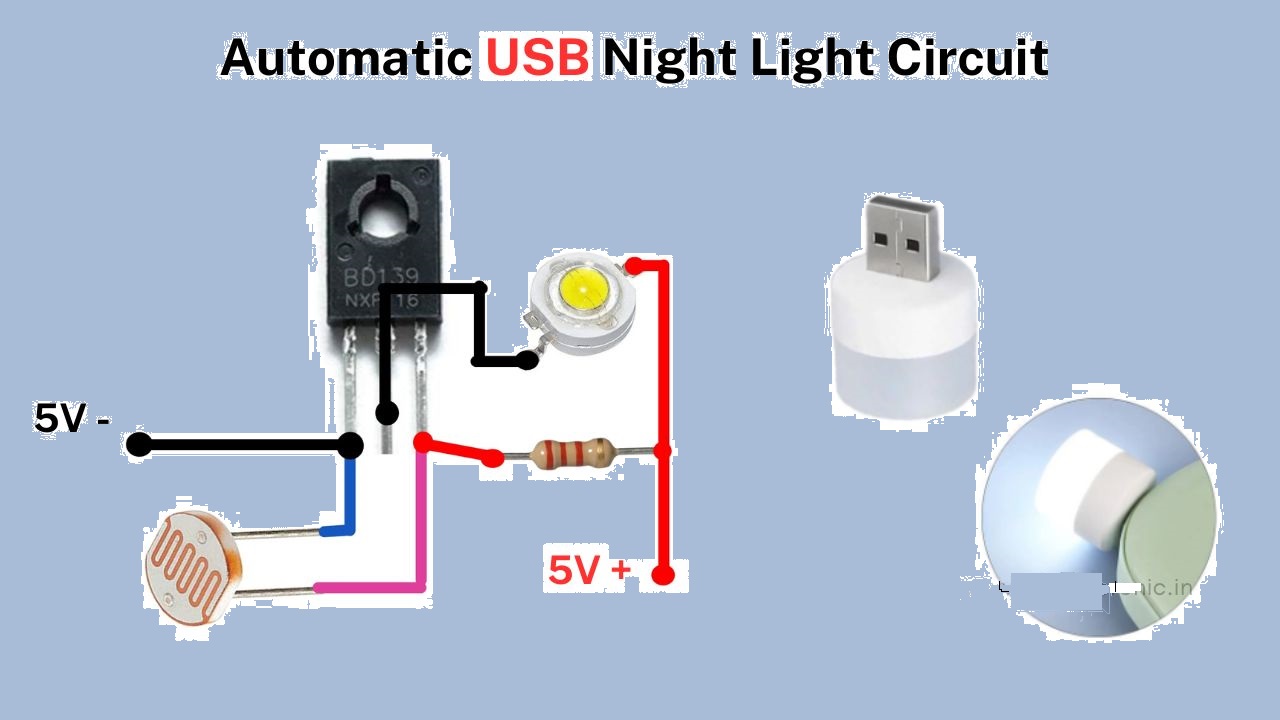
This project is an automatic night light designed to operate directly using a USB cable for power. When the room is dark at night, the Light Dependent Resistor (LDR) senses the low light conditions, triggering the LED to turn on automatically. As the ambient light increases, the LDR detects this change, causing the LED to turn off accordingly. This system ensures convenient and automatic illumination during nighttime hours without the need for manual intervention.”
WORKING:
Detects Light -It uses a sensor to see how bright it is around.
Decides What to Do -A little brain inside figures out if it should turn on the night light or keep it off based on how bright or dark it is.
Saves Energy -It's smart about using power, so it doesn't waste electricity when it doesn't need it.
Recommendation- Designing and executing a science project nurtures curiosity, encouraging students to explore possibilities and cultivate solo innovation in their field.
In this tutorial, you’ll learn how to build an automatic night light circuit that turns on when it gets dark. It's a simple circuit that you can build on a breadboard.
This circuit shows you how to do it with an LED. But you can use the same principle to turn on bigger and brighter lights too.
9V Battery
Breadboard
Photoresistor (around 5kΩ in light, 200kΩ or more in dark)
Transistor BC547
Resistor 100 kΩ
Resistor 470Ω
Light-Emitting Diode (LED)
There are many ways to connect this circuit. I recommend using a breadboard since it’s quick and you can easily reuse components.
Below you can see how I connected this circuit on a breadboard:
How The Night Light Circuit Works
The photoresistor and the 100 kΩ resistor make up a voltage divider.
When there is a lot of light, the photoresistor will have low resistance, which means the voltage divider gives a low output voltage. So the transistor is off and cuts off the current to the LED. Which means no light.
When it’s dark, the photoresistor will have high resistance. That means the voltage divider gives a high output voltage which turns on the transistor. That means the LED is also on and will light up.
What Are the Voltages out From the Voltage Divider?
When it’s light and the photoresistor value is low, the output from the voltage divider is around 0.5V, which is not enough to turn on the transistor.
When it’s dark and the photoresistor value is high, the output from an unconnected voltage divider would be around 4.5V.
But since the output of the voltage divider is connected on the base of the transistor, the voltage will be limited by the forward voltage of the base-emitter connection (around 0.7V).
Questions?
Did you build the night light circuit? Do you have any questions about how it works or how to build it? Let me know in the comment section below.


No comments:
Post a Comment