AC to DC Converter using Transformer, diode & Capacitor | Bridge Rectifier
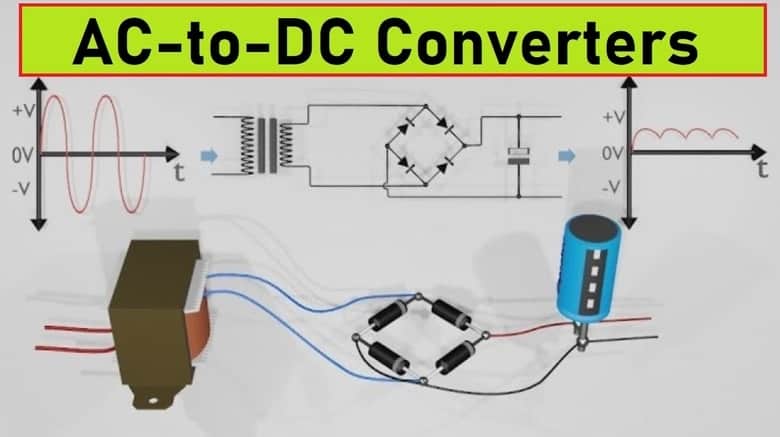
In this video, I will show you the basic working principles of traditional chargers or power supplies that we use in daily life. At the end of this video, you will have learned what stages the AC to DC conversion process of power supplies consists of and how it takes place.
The stages of converting AC to DC, as here, consist of first reducing the voltage with the help of a transformer, then rectification, filtering and finally regulation. The conversion process I will show here will be based on the example of converting 220V AC to 10V DC, which is used in many countries around the world. Since the conversion process is logically the same, you can make calculations according to the voltage value in your country if you wish. Now let's examine in detail what the shape of the voltage is after each step and what the circuit diagram looks like.
The small AC to DC Voltage Converter project uses four diodes to make one bridge rectifier to transfer AC power to DC power. Also, we use capacitors to remove ripples in the circuit. After we transfer from AC power to DC power, we need to use one 5v voltage regulator to give 5v DC output from 12v DC output.
In this project we choose a 12VAC 20VA transformer with screws at the bottom. In order to power the circuit with this transformer, we have to screw the jumer wire pin inside and plug it to the breadboard. Because this is an AC power supply, the positive and negative side does not matter.
In this step, we build a bridge rectifier which make up of four 1N4001 diodes. Then, we parallel this rectifier with an 1000uf parallel to remove some ripple. The thing need to be noticed is the polarity, remember the silver line on the diode indicates that it is a cathode terminal. After finishing the building, please use mini voltage display to test the voltage across the capacitor. It will give you an around 18v DC power.
In this step, we need to use the 5v IC Regulator, one 0.1uf ceramic capacitor, one 0.22uf ceramic capacitor and one 1000uf electrolytic capacitor. For the IC regulator, with the lead on the bottom, the left is input, the middle is ground and the right is output. After finishing building the circuit, you can use voltage display to test the output voltage by paralleling it with the last 1000uf capacitor. You will see the output is 5v DC.
In this project, we can only have a 5v DC output. However, we can try to figure out output any voltage from 0v to 12v DC. This can be solved by replacing voltage regulator 7805 with a variable voltage regulator LM317.


No comments:
Post a Comment